Introduction
Ever tried AI-powered development and thought, “This is generating more bugs than code”?
Here’s the thing: AI isn’t magic. Think of it as a brilliant but literal-minded junior developer on your team.
Would you instruct a junior developer to build a user authentication system without context or requirements? Probably not. Yet, that’s exactly how most people use AI.
At CAW, after months of trial and error with Cursor, we’ve cracked the code, so to speak. It isn’t about what AI can do but how you guide or instruct it.
In this article, we’ll show you how to turn Cursor from a buggy code generator into your most reliable pair programmer.
The Three Pillars of Effective AI Development
- Clear System Architecture: Ensure AI has a holistic understanding of your system.
- Structured Task Management: Break down work into manageable, well-defined tasks.
- Explicit Development Rules: Guide the AI with clear patterns and conventions.
Let’s explore how to integrate each of these pillars into your workflow.
Setting Up Your Project for Success
First, let’s create a project structure that both you and AI can understand:
project-root/

├── .cursorrules # AI behaviour configuration

├── docs/

│ ├── architecture.mermaid # System architecture diagram

│ ├── technical.md # Technical documentation

│ └── status.md # Progress tracking

├── tasks/

│ └── tasks.md # Broken down development tasks

└── src/ # Source code
The Brain of Your AI Assistant: .cursorrules
Below is a battle-tested .cursorrules file that we’ve refined over months of development:
# Project Context and Architecture

SYSTEM_CONTEXT: |

 You are a senior developer working on a TypeScript/NestJS project.

 Required file reads on startup:

 - docs/architecture.mermaid: System architecture and component relationships

 - docs/technical.md: Technical specifications and patterns

 - tasks/tasks.md: Current development tasks and requirements

 - docs/status.md: Project progress and state

 Before making any changes:

- Parse and understand system architecture from docs/architecture.mermaid

- Check current task context from tasks/tasks.md

- Update progress in docs/status.md

- Follow technical specifications from docs/technical.md

# File Management Rules

ON_FILE_CHANGE: |

 Required actions after any code changes:

- READ docs/architecture.mermaid to verify architectural compliance

- UPDATE docs/status.md with:

     - Current progress

     - Any new issues encountered

     - Completed items

- VALIDATE changes against docs/technical.md specifications

- VERIFY task progress against tasks/tasks.md

# Code Style and Patterns

TYPESCRIPT_GUIDELINES: |

 - Use strict typing, avoid 'any'

 - Follow SOLID principles

 - Write unit tests for all public methods

 - Document with JSDoc

# Architecture Understanding

READ_ARCHITECTURE: |

 File: docs/architecture.mermaid

 Required parsing:

- Load and parse complete Mermaid diagram

- Extract and understand:

     - Module boundaries and relationships

     - Data flow patterns

     - System interfaces

     - Component dependencies

- Validate any changes against architectural constraints

- Ensure new code maintains defined separation of concerns

 Error handling:

- If file not found: STOP and notify user

- If diagram parse fails: REQUEST clarification

- If architectural violation detected: WARN user

# Task Management

TASK_WORKFLOW: |

 Required files:

 - tasks/tasks.md: Source of task definitions

 - docs/status.md: Progress tracking

 - docs/technical.md: Implementation guidelines

 Workflow steps:

- READ tasks/tasks.md:

     - Parse current task requirements

     - Extract acceptance criteria

     - Identify dependencies

- VALIDATE against docs/architecture.mermaid:

     - Confirm architectural alignment

     - Check component interactions

- UPDATE docs/status.md:

     - Mark task as in-progress

     - Track completion of sub-tasks

     - Document any blockers

- IMPLEMENT following TDD:

     - Create test files first

     - Implement to pass tests

     - Update status on test completion

# Error Prevention

VALIDATION_RULES: |

- Verify type consistency

- Check for potential null/undefined

- Validate against business rules

- Ensure error handling
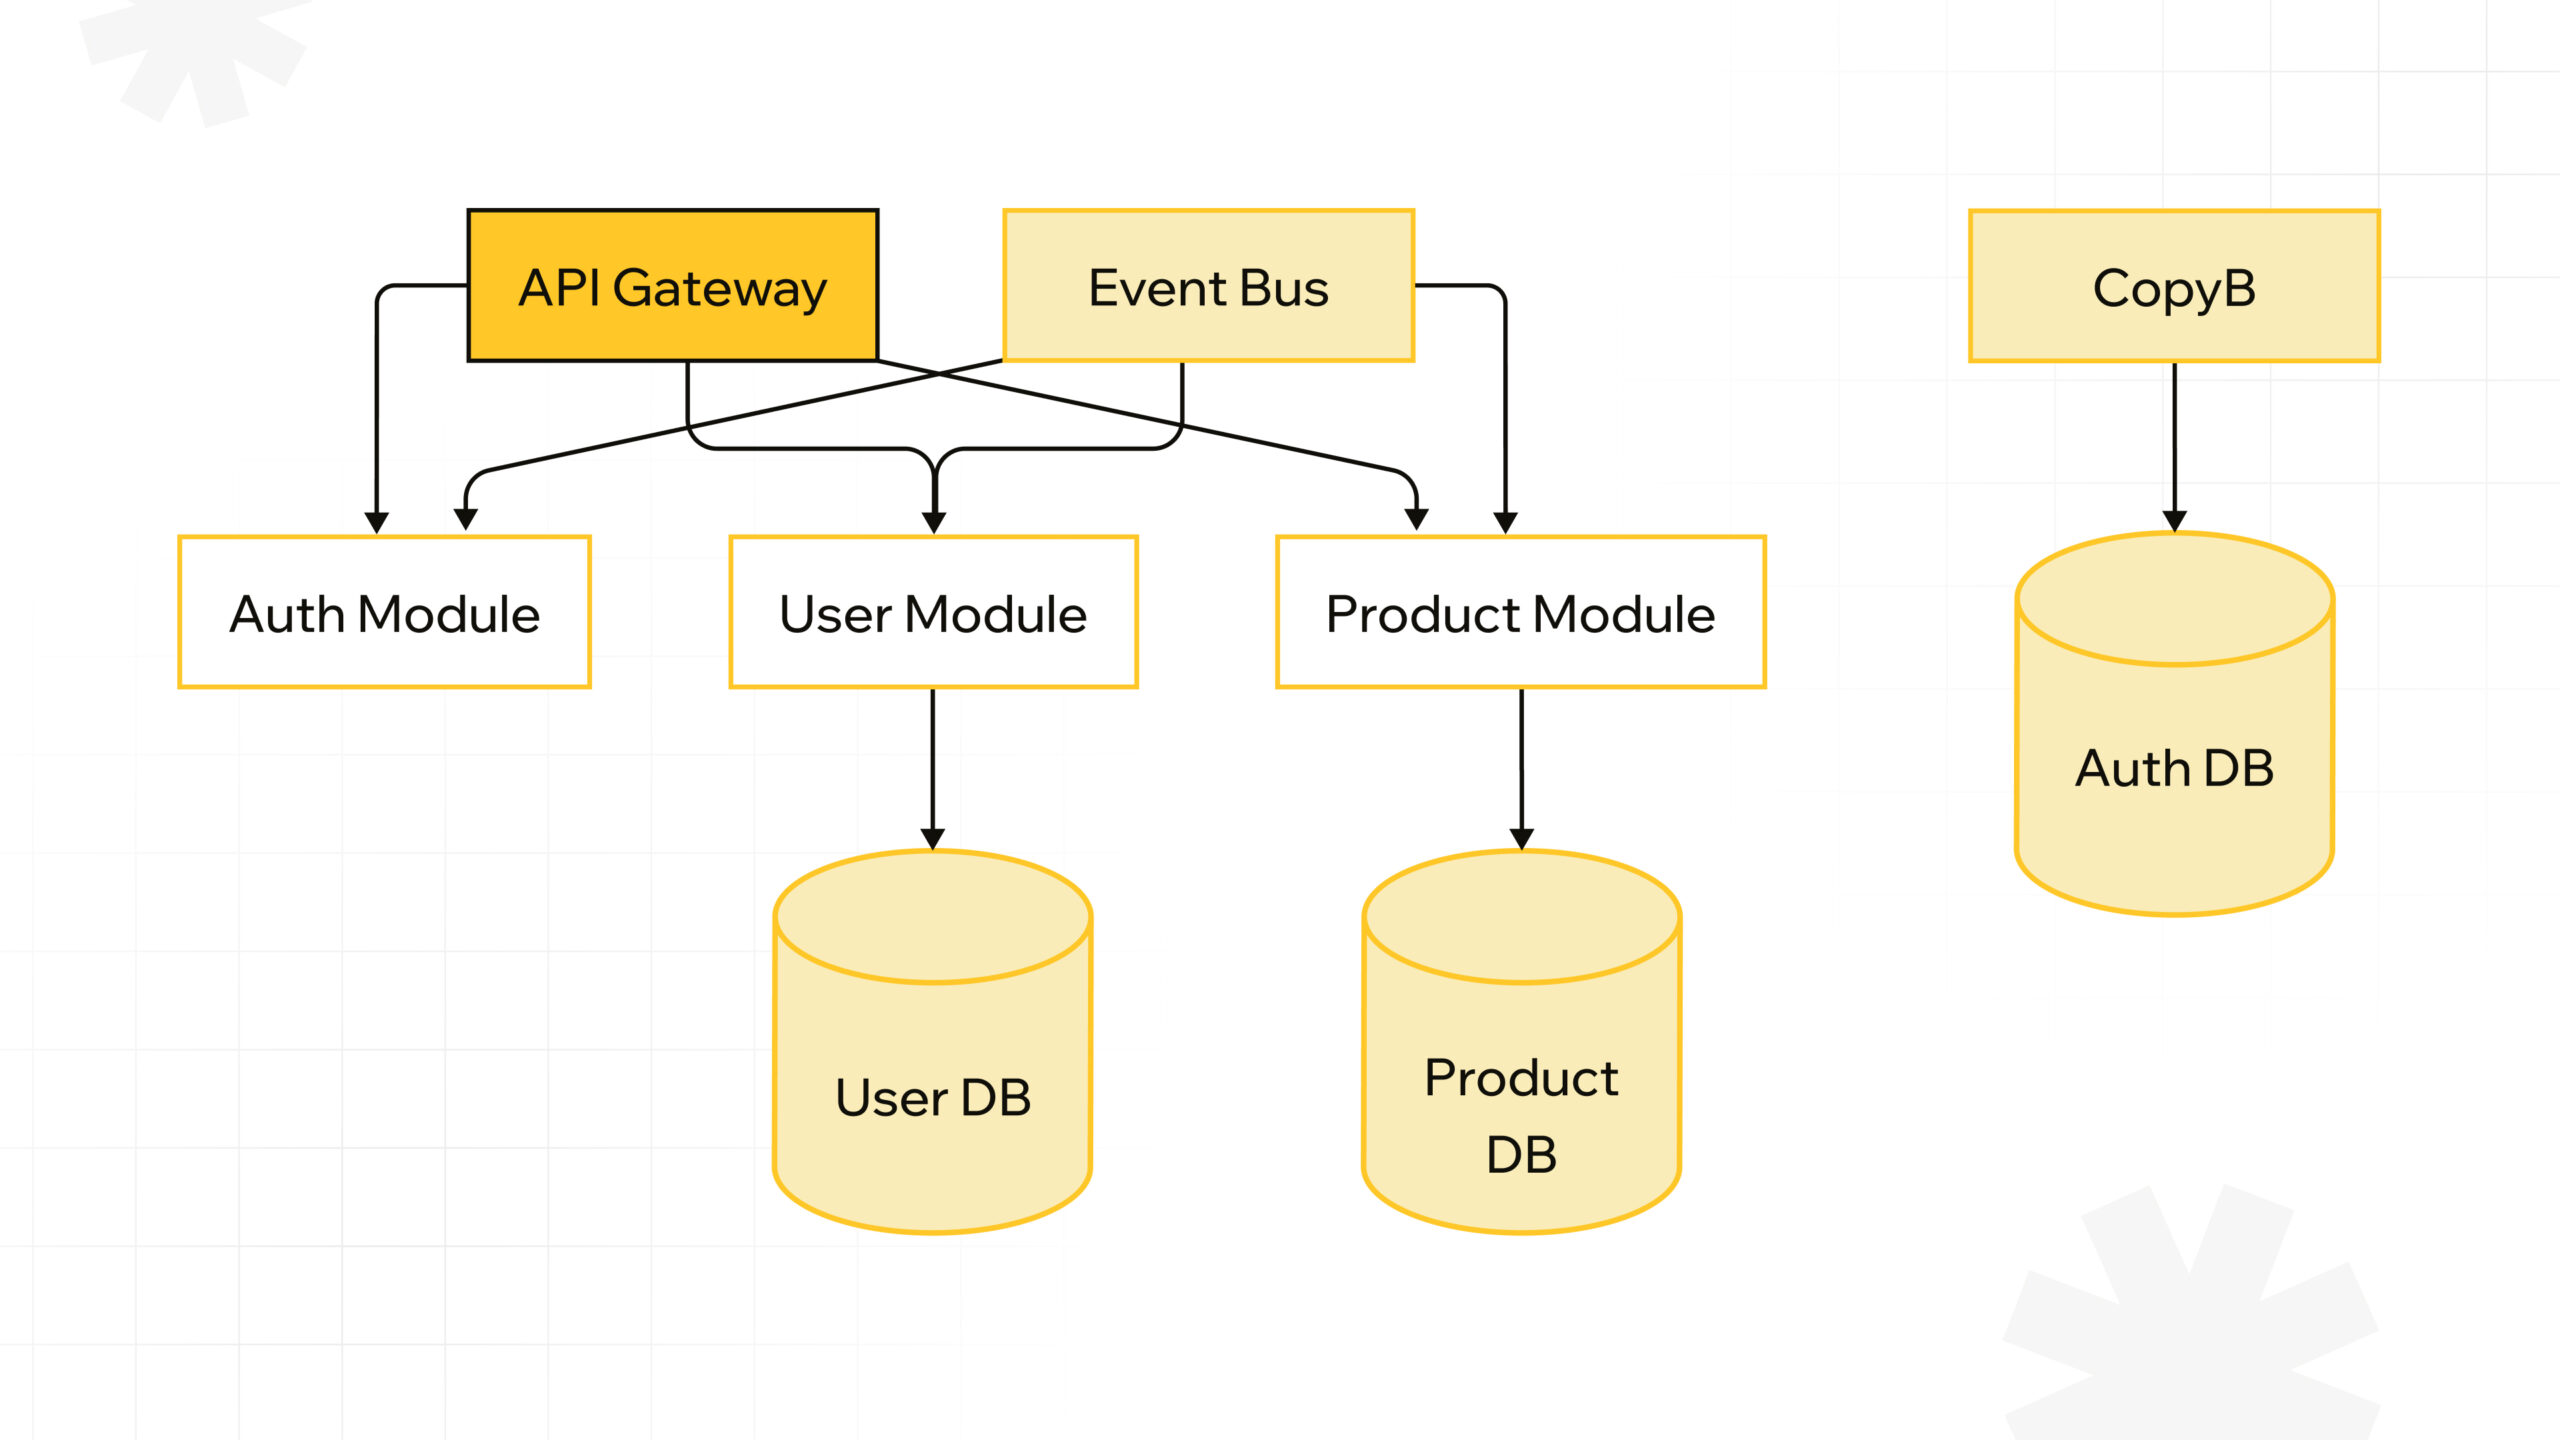
The Architecture Blueprint: architecture.mermaid
Let’s create a clear and structured system architecture diagram that AI can understand:
graph TD

A[API Gateway] --> B[Auth Module]

A --> C[User Module]

A --> D[Product Module]

CopyB --> E[(Auth DB)]

C --> F[(User DB)]

D --> G[(Product DB)]

H[Event Bus] --> B

H --> C

H --> D

style A fill:#f9f,stroke:#333,stroke-width:4px

style B fill:#bbf,stroke:#333,stroke-width:2px

style C fill:#bbf,stroke:#333,stroke-width:2px

style D fill:#bbf,stroke:#333,stroke-width:2px
The above code looks like this:
High-Level Technical Architecture: technical.md
Here is a sample technical architecture document which gives a high-level understanding of the application:
## Overview

This document outlines the technical architecture for an AI-based IDE built using NestJS, TypeORM, and TypeScript. The system follows a modular microservices architecture with event-driven communication patterns.

## Technology Stack

- **Backend Framework**: NestJS

- **Database ORM**: TypeORM

- **Language**: TypeScript

- **Event Bus**: RabbitMQ

- **Database**: PostgreSQL

- **Authentication**: JWT + OAuth2

## Core Modules

### 1. API Gateway Module

```typescript

// src/gateway/gateway.module.ts

@Module({

 imports: [

   ClientsModule.register([

     {

       name: "AUTH_SERVICE",

       transport: Transport.RMQ,

       options: {

         urls: ["amqp://localhost:5672"],

         queue: "auth_queue",

       },

     },

   ]),

 ],

 controllers: [ApiGatewayController],

 providers: [ApiGatewayService],

})

export class ApiGatewayModule {}

```

### 2. Authentication Module

```typescript

// src/auth/entities/user.entity.ts

@Entity()

export class User {

 @PrimaryGeneratedColumn("uuid")

 id: string;

 @Column({ unique: true })

 email: string;

 @Column()

 password: string;

 @Column({ type: "json", nullable: true })

 preferences: Record<string, any>;

}

// src/auth/auth.service.ts

@Injectable()

export class AuthService {

 constructor(

   @InjectRepository(User)

   private userRepository: Repository<User>,

   private jwtService: JwtService

 ) {}

 async validateUser(email: string, password: string): Promise<any> {

   const user = await this.userRepository.findOne({ where: { email } });

   if (user && (await bcrypt.compare(password, user.password))) {

     return user;

   }

   return null;

 }

}

```

### 3. User Module

```typescript

// src/user/entities/profile.entity.ts

@Entity()

export class Profile {

 @PrimaryGeneratedColumn("uuid")

 id: string;

 @OneToOne(() => User)

 @JoinColumn()

 user: User;

 @Column({ type: "json" })

 ideSettings: Record<string, any>;

 @Column({ type: "json" })

 aiPreferences: Record<string, any>;

}

```
### 4. Product Module (IDE Core)

```typescript

// src/ide/entities/project.entity.ts

@Entity()

export class Project {

 @PrimaryGeneratedColumn("uuid")

 id: string;

 @ManyToOne(() => User)

 owner: User;

 @Column()

 name: string;

 @Column({ type: "json" })

 configuration: Record<string, any>;

 @Column({ type: "jsonb" })

 aiContext: Record<string, any>;

}

```

## Event-Driven Architecture

### Event Bus Configuration

```typescript

// src/common/event-bus/event-bus.module.ts

@Module({

 imports: [

   ClientsModule.register([

     {

       name: "EVENT_BUS",

       transport: Transport.RMQ,

       options: {

         urls: ["amqp://localhost:5672"],

         queue: "main_event_queue",

       },

     },

   ]),

 ],

 providers: [EventBusService],

 exports: [EventBusService],

})

export class EventBusModule {}

```

### Event Handlers

```typescript

// src/ide/events/code-analysis.handler.ts

@Injectable()

export class CodeAnalysisHandler {

 @EventPattern("code.analysis.requested")

 async handleCodeAnalysis(@Payload() data: CodeAnalysisEvent) {

   // AI-powered code analysis logic

 }

}

```

## Database Schema

### TypeORM Configuration

```typescript

// src/config/typeorm.config.ts

export const typeOrmConfig: TypeOrmModuleOptions = {

 type: "postgres",

 host: process.env.DB_HOST,

 port: parseInt(process.env.DB_PORT, 10),

 username: process.env.DB_USERNAME,

 password: process.env.DB_PASSWORD,

 database: process.env.DB_DATABASE,

 entities: [User, Profile, Project],

 migrations: ["dist/migrations/*.js"],

 synchronize: false,

 logging: true,

};

```

## AI Integration Services

### Code Analysis Service

```typescript

// src/ide/services/ai-analysis.service.ts

@Injectable()

export class AIAnalysisService {

 constructor(

   private readonly httpService: HttpService,

   private readonly eventBus: EventBusService

 ) {}

 async analyzeCode(code: string, context: AIContext): Promise<AnalysisResult> {

   // AI model integration logic

 }

}

```

### Code Completion Service

```typescript

// src/ide/services/code-completion.service.ts

@Injectable()

export class CodeCompletionService {

 constructor(

   private readonly aiService: AIService,

   private readonly codeContextService: CodeContextService

 ) {}

 async getCompletion(

   code: string,

   position: Position,

   context: CompletionContext

 ): Promise<CompletionSuggestion[]> {

   // Code completion logic

 }

}

```

## Security Implementations

### Authentication Guard

```typescript

// src/auth/guards/jwt-auth.guard.ts

@Injectable()

export class JwtAuthGuard extends AuthGuard("jwt") {

 constructor(private reflector: Reflector) {

   super();

 }


 canActivate(context: ExecutionContext) {

   const isPublic = this.reflector.getAllAndOverride<boolean>(IS_PUBLIC_KEY, [

     context.getHandler(),

     context.getClass(),

   ]);


   if (isPublic) {

     return true;

   }


   return super.canActivate(context);

 }

}

```

## Deployment Architecture

### Docker Configuration

```dockerfile

# Dockerfile

FROM node:16-alpine

WORKDIR /usr/src/app

COPY package*.json ./

RUN npm install

COPY . .

RUN npm run build

EXPOSE 3000


CMD ["npm", "run", "start:prod"]

```

### Docker Compose Setup

```yaml

# docker-compose.yml

version: "3.8"

services:

 api:

   build: .

   ports:

     - "3000:3000"

   depends_on:

     - postgres

     - rabbitmq


 postgres:

   image: postgres:13

   environment:

     POSTGRES_PASSWORD: ${DB_PASSWORD}

     POSTGRES_DB: ${DB_NAME}


 rabbitmq:

   image: rabbitmq:3-management

   ports:

     - "5672:5672"

     - "15672:15672"

```

## Scaling Considerations

**Horizontal Scaling**

  - Use Kubernetes for container orchestration

  - Implement load balancing at the API Gateway level

  - Scale individual microservices independently

**Performance Optimization**

  - Implement caching strategies using Redis

  - Optimize database queries and indexes

  - Use WebSocket for real-time features

**Monitoring and Logging**

  - Implement ELK stack for centralized logging

  - Use Prometheus and Grafana for metrics

  - Set up application performance monitoring

## Development Workflow

**Local Development**


  ```bash

  # Start development environment

  npm run start:dev


  # Run database migrations

  npm run typeorm migration:run


  # Generate new migration

  npm run typeorm migration:generate -- -n MigrationName

  ```

**Testing Strategy**


  ```typescript

  // src/ide/tests/code-analysis.service.spec.ts

  describe("CodeAnalysisService", () => {

    let service: CodeAnalysisService;


    beforeEach(async () => {

      const module: TestingModule = await Test.createTestingModule({

        providers: [CodeAnalysisService],

      }).compile();


      service = module.get<CodeAnalysisService>(CodeAnalysisService);

    });


    it("should analyze code correctly", async () => {

      // Test implementation

    });

  });

  ```

## Future Considerations

**AI Model Integration**

  - Support for multiple AI models

  - Custom model training capabilities

  - Model versioning and A/B testing


**Extensibility**

  - Plugin architecture

  - Custom extension marketplace

  - API versioning strategy


**Developer Experience**

  - Interactive documentation

  - Developer portal

  - API playground
Task Breakdown: tasks.md
Here’s how to structure your tasks for AI understanding:
# Current Sprint Tasks

## USER-001: Implement User Authentication

Status: In Progress

Priority: High

Dependencies: None

### Requirements

- Email/password authentication

- JWT token generation

- Password hashing with bcrypt

- Rate limiting on login attempts

### Acceptance Criteria

- Users can register with email/password

- Users receive JWT on successful login

- Passwords are securely hashed

- Failed login attempts are rate limited

### Technical Notes

- Use @nestjs/jwt for token management

- Implement rate limiting using Redis

- Follow authentication patterns from technical.md
Progress Tracking: status.md
This file helps AI understand the current state of development:
# Project Status

## Completed Features

- Basic project setup

- Database connections

- Base module structure

## In Progress

- User authentication (USER-001)

 - ✅ Basic user model

 - ✅ Password hashing

 - 🏗️ JWT implementation

 - ⏳ Rate limiting

## Pending

- Email verification

- Password reset flow

- User profile management

## Known Issues

- None currently
Managing Context and File References
The real power of Cursor lies within smart context management. Every time you hit a context limit (which happens frequently in larger projects), you need a way to quickly restore the AI’s understanding of your project. That’s why having a well-structured file and referencing system is essential. Let’s break down how it works in practice.
Understanding Context Limits — and Why status.md Is Crucial
Here’s something most tutorials won’t tell you: AI assistants like Cursor have context limits. Once you hit that limit, the AI loses track of previous changes and discussions. This is where status.md comes in.
Think of status.md as your project’s memory. When Cursor hits its context limit (which will happen more often than you’d think), you can use status.md to quickly restore context—without needing to re-explain everything from scratch.
Here’s an example of hitting a context limit:
You: Let's continue working on the authentication service

Cursor: *Has no idea about previous implementation details because of context limit*

You: @{docs/status.md} Let's continue with JWT implementation

Cursor: *Now understands current state and can continue appropriately*
Practical File Referencing in Cursor
Now, let’s put aside made-up commands. Here’s how you can effectively reference files in Cursor during real-world development.
1. Adding Context from Multiple Files
@{docs/status.md}

@{docs/technical.md}

@{tasks/tasks.md}

Now, let's implement the JWT authentication service...
2. Checking Current Implementation
@{src/auth/auth.service.ts}

Can you add rate limiting based on @{docs/technical.md} specifications?
Real-World Example: Building the Authentication Service
Let’s see how this works in practice with proper file referencing and context management:
1. Start by Gathering Context
@{docs/architecture.mermaid}

@{tasks/tasks.md}

@{docs/status.md}

I need help implementing the JWT authentication service from USER-001.
2. Hit a Context Limit During Implementation?
@{docs/status.md}

Let's continue with the JWT service implementation. We were working on rate limiting.
3. Adding New Features
@{src/auth/auth.service.ts}

@{docs/technical.md}

Can you add the password reset functionality following our technical specifications?
Why This Approach Works
- Cursor receives fresh context each time you reference a file
- status.md helps track progress across context resets
- Technical specifications remain consistent even when context is lost
The Reality Check
Let’s address the elephant in the room — AI coding assistants are often marketed as magical code generators that will write your entire application. This is precisely why many developers get frustrated and claim that “AI generates more bugs than code.”
However, the reality is vastly different. AI is like having a brilliant junior developer who:
- Has perfect memory of patterns (within context limits)
- Writes boilerplate at lightning speed
- Struggles with complex business logic
- Needs clear specifications and guidance
- Works best when following test-driven development
Why Most Developers Struggle with AI
Here’s the typical approach we often see:
Developer: "Build me a user authentication system with OAuth"

AI: *Generates seemingly complete code*

Developer: *Finds bugs in edge cases*

Developer: "AI is unreliable!"
But the real issue is that we’re using AI the wrong way. Let us show you how to transform your approach.
Test-Driven Development: Your Shield Against AI Hallucinations
Here’s a truth bomb: AI will hallucinate. It will create plausible-looking code that’s subtly wrong. The solution? TDD.
Consider this real-world scenario:
// ❌ Without TDD

@{src/auth/auth.service.ts}

// Developer: "Add password reset functionality"

// AI generates code that:

// - Looks correct

// - Handles the happy path

// - Misses critical edge cases

// - Has security vulnerabilities in token validation

// ✅ With TDD

@{src/auth/auth.service.spec.ts}

// Developer: "Here are the test cases for password reset:

describe('PasswordResetService', () => {

 it('should throw if token is expired')

 it('should prevent timing attacks in token comparison')

 it('should rate limit reset attempts')

 it('should handle non-existent emails securely')

})

// Now implement the service to pass these tests"
Why TDD Works with AI:
- Forces explicit requirements
- Prevents hallucinated behavior
- Catches edge cases early
- Maintains security considerations
The Real Development Pitfalls (And How to Avoid Them)
1. Complex Logic Hallucinations
AI often generates dangerously oversimplified logic when asked to handle complex requirements. It may appear sound at first glance until you hit the edge cases.
// ❌ Dangerous: Letting AI handle complex business logic directly

"Implement the billing calculation logic"

// ✅ Safe: Breaking it down with tests

@{src/billing/billing.spec.ts}

"Implement the billing calculation to pass these test cases:

- Basic rate calculation

- Volume discounts

- Special holiday rates

- Multi-currency support"
2. State Management Traps
When AI handles state, it often creates subtle bugs. For instance:
// ❌ Problematic

export class UserService {

 private users: User[] = []; // Global state!

 async createUser(user: User) {

   this.users.push(user); // Race conditions waiting to happen

 }

}

// ✅ Correct

export class UserService {

 constructor(private readonly userRepository: UserRepository) {}

 async createUser(user: User) {

   await this.userRepository.transaction(async (repo) => {

     await repo.save(user);

   });

 }

}
3. Dependency Hell
AI loves to create circular dependencies. Here’s how to prevent them:
// ❌ AI's natural tendency

@{src/user/user.service.ts} depends on @{src/auth/auth.service.ts}

@{src/auth/auth.service.ts} depends on @{src/user/user.service.ts}

// ✅ Correct approach

@{docs/architecture.mermaid}

"Given this architecture, implement the user service ensuring:

- Dependencies flow one way

- Use interfaces for cross-module communication

- Event-driven communication for circular requirements"
Context Limits: A Practical Guide
When you hit context limits (and you will), here’s what actually happens:
// Initial implementation

@{src/auth/auth.service.ts}

"Add OAuth support"

// AI: Implements OAuth perfectly

// Later in the conversation...

"Add refresh token support"

// AI: Implements it incorrectly because it lost context

// Solution: Restore context with status

@{docs/status.md}

@{src/auth/auth.service.ts}

"Add refresh token support to our OAuth implementation"

// AI: Now has full context and implements correctly
Real-World Context Management
- Keep status.md focused on architectural decisions
- Document key implementation patterns
- Reference relevant tests for behavior specifications
Security and Error Handling: The Hidden Pitfalls
AI has a dangerous tendency to:
- Skip error handling
- Use unsafe type assertions
- Miss security validations
The solution here is to use explicit error and security tests:
describe('UserAuthentication', () => {

 it('should handle SQL injection attempts')

 it('should prevent timing attacks')

 it('should rate limit failed attempts')

 it('should log security events')

 it('should sanitize error messages')

})
Best Practices for Clean AI Development
- Always Start with Architecture: Update your Mermaid diagrams first and ensure that AI understands system boundaries.
- Break Down Tasks: Create clear, focused tasks, and include all requirements and acceptance criteria.
- Maintain Status: Keep status.md updated and make sure to track progress and issues.
- Use TDD: Write tests first and let AI implement them to pass tests.
Conclusion
The key to successful AI development isn’t about having the smartest AI — it’s about providing the right context and structure. By following this playbook, you can turn Cursor from an occasionally helpful tool into a reliable development partner.
It ultimately comes down to clear architecture, structured tasks, explicit rules, and consistent updates.
Stop fighting with AI and start collaborating with it. The results might surprise you.
At CAW, we’re committed to helping businesses build AI-driven, custom software solutions that enhance operational efficiency, reduce development time, and improve scalability.
Our approach is as straightforward as it is effective — we identify use cases that will benefit most from AI automation or agents and develop practical, scalable solutions that drive long-term business growth.
If you’re interested in exploring how your business can benefit from AI, we’d be happy to discuss the right solution for your requirements. Schedule a call with us today!
FAQs
Why does AI often generate buggy or incorrect code?
AI often lacks the full project context. Without clear system architecture, explicit development rules, and well-structured tasks, it behaves like a junior developer simply guessing requirements — leading to incomplete or buggy implementations.
What are context limits in Cursor, and why do they matter?
Context limits refer to how much information Cursor can retain in one interaction. Once exceeded, it may lose track of your project, requiring file references like status.md to restore continuity.
How do you keep AI development consistent across sessions?
Use structured files like .cursorrules, status.md, and technical.md to document architecture, tasks, and progress. Referencing these in your prompts ensures Cursor always starts with the right context.
Why is status.md so important in AI-powered workflows?
status.md is akin to your project’s memory. When AI loses track due to context limits, referencing this file helps quickly restore context without needing to explain everything again.
What role does Test-Driven Development (TDD) play with AI?
TDD enforces explicit requirements, prevents hallucinated behavior, catches edge cases early, and ensures AI-written code maintains security considerations before it’s shipped.